Ten games to support communication in primary school aged children

| |

When parents visit me with their child, their stress is palpable. Often parents don’t relish or even expect to be asked to practise strategies at home with their child between sessions. Let alone to practise whilst on holiday. I understand that you don’t necessarily want anything extra added to your daily ‘to do’ lists. This is why we try our best to incorporate all speech and language therapy practice into children’s daily activities.

For example:

  1. during bath time;
  2. mealtimes;
  3. getting ready for bedtime;
  4. story time
  5. yes, playtime!

These are activities that all parents will engage with anyway, so it seems to make sense to incorporate both. This is to avoid adding extra pressure on parents’ already stressful and time-poor daily lives. I am hoping my blog will come in handy, especially for the summer holidays.

On holiday you are unlikely to have your usual games and toys with you – so here is a nice little list of things you can use instead of traditional games and toys:

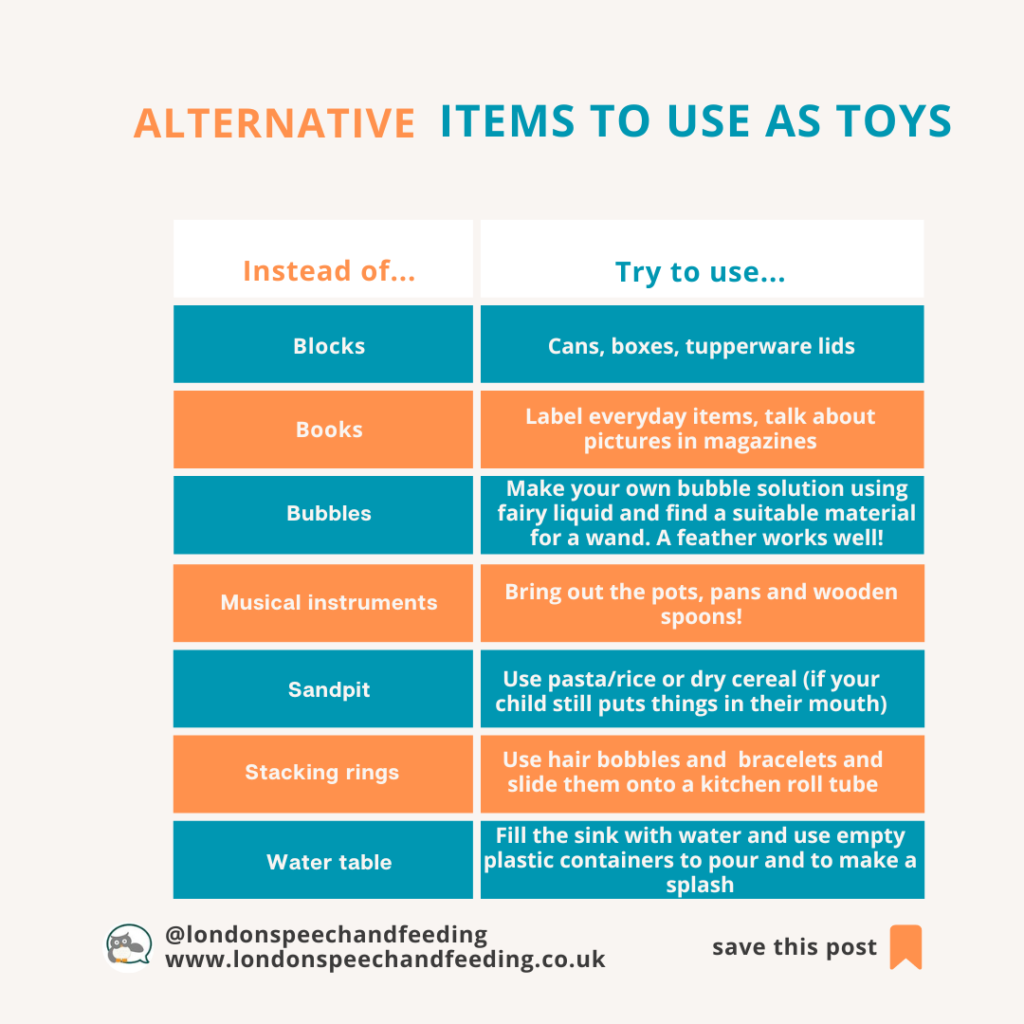
If you can think of any other alternatives on holiday and would like to tell me about them, I would love to see your comments below. We can never have too many holiday games!!

If you are at home over the summer and you do have some games in the cupboard you might want to dust these ones down or buy one or two new ones (if you want to).

Most games have multiple uses, and it’s always best to adapt a game to match your child’s interests and what motivates them.

So let’s start…

  1. Pop up pirate: pop a sword into the barrel and watch the pirate pop up randomly. Practise social skills, speech sounds, expressive language (e.g., put a sword on a picture, say the word/sentence then pick up the sword and push it into the barrel).
  2. Word games such as ‘ISpy’, ‘I went to the shop and I bought…’, ‘describe a person and guess who they are’: perfect for when you’re on the move, whether travelling or walking. You can play this anywhere and still support speech, language and communication. You could play ISpy using your child’s special sound, or ‘I went to the shop and bought all things beginning with [insert special sound here]’.
  3. Shopping list: Orchard game is a game to practise categorising. We explain the analogy of the brain being like a filing cabinet. If information is all in the correct place, it’s easier to find, retrieve and use. You can also practise specific speech sounds in this activity. You could also put the words in a sentence to add more of an expressive language element.
  4. Wiggly worms: this Orchard game is all about phonological (awareness of sounds) awareness. Matching a letter with the word. You can also practise the sounds in the words (e.g, g-o-l-d = gold; m-a-ke = make). Talk about the elements, e.g., ‘g-o-l-d’ has 4 sounds, 1 syllable; ‘m-a-ke has 3 sounds, one syllable. You can talk about what words rhyme with the different words and what makes a rhyming word (i.e., the middle and end sounds remain the same).
  5. Sound detectives: this Orchard game allows children to identify sounds. It also has an app (if your child prefers a tech-way of learning). Children identify the sound then they can add the picture card to their path and become closer to being a successful detective. This game can also support memory skills.
  6. Conversation cubes: throw the dice and start building a story. You can also create and use ‘colourful semantics’ sentence strips to support expressive (spoken) language as support to build the narrative.
  7. Think words: ‘name it, press it, pass it’. A great game to expand word knowledge. You can talk about the words at the end of each round exploring semantic (meanings) and phonemic (sounds) links. Your child can also develop social skills (such as attention, listening and turn-taking).
  8. Poo bingo: this is perfectly disgusting but equally fun for kids of about 3.5 years plus – if your child’s target is to practise /p/ sound this is the one for you. You can also learn all about the different animal’s poo, which I am sure you have always wanted to do!! The more we know about a word, the easier it is to store, retrieve and use. Yes, even talking about poo can help!! Also, it’s great for our visual learners.
  9. Simon says: a game that can be played indoors or outdoors. Parents can take turns being “Simon” and give various commands that your child must follow. This means that your child can practise their receptive (understanding of) language as well as their expressive language, speech sounds and social skills (such as turn-taking and initiating).
  10. Ker-plunk: this is perfect for practising your child’s special sound. Repetition is very important, but also can be monotonous, so finding a game that they enjoy is vital. Take turns to pull out a stick. Next, your child can either say their special sound or word (depending on what stage they are at) or hear a good model from other players.

Do you still have questions? Contact Sonja for support.


Find a speech and language therapist for your child in London. Are you concerned about your child’s speech, feeding or communication skills and don’t know where to turn? Please contact me and we can discuss how I can help you or visit my services page.

0

Similar Posts

  • ·

    Joint attention for children with autism

    Kids Speech Therapist London

    Why is joint engagement important for communication development?

    It has been well-documented that the development of joint attention is impaired in children who have social communication difficulties or autism. It is, in fact, this impairment which distinguishes children with ASD from children who have other developmental delays.

    A lack of joint attention in very young children is an early sign of autism as it is a signal that there is a disruption in the motivation to connect socially with others. Since this is a crucial element, I thought I would outline what we mean by Joint Attention as supported by the research undertaken at Hanen.org.

    In typically developing children, the ability to shift attention between a person and an object for the purposes of connecting socially or for requesting develops around the same time. However, for children with ASD, these components emerge one at a time and in a linear fashion. Children with ASD usually start with requesting something and later they may learn to share attention for social sharing. (see pattern below as a general guide).

    As with typical development, there is variation in the order that these skills emerge but the following patterns of development is commonly seen:

    • Reaching, taking adult’s arm/hand or pointing to ask for something — but without looking at the adult
    • Gradually alternating looking between person and object of desire
    • Then learning to follow the point of another — which is responding to joint attention initiated by another
    • Directing attention to share interests — without looking at the adult: pointing to a truck on the road/ helicopter circling above
    • Then directing attention to share interest by alternating gaze shift between person and object — here the child is now initiating joint attention.

    What is important to note is that in order to fulfil the criteria for true joint attention, the purpose of directing the attention of another person must be social in nature. In other words, it must not be exclusively to obtain a desirable object or event/action. True Joint Attention is seen verbally or non-verbally; we want to share a thought with another person and direct them to something we are interested or excited or spooked by.

    For example: we can see an amazing firework display in the distance and we want to quickly direct our friend’s attention to this. In order to do this we might be tugging their sleeve/arm whilst pointing to the display in the distance, and perhaps we might add “wow look over there!” We are doing so simply to share an interest without obtaining anything, we are just being social with each other. So True Joint Attention is not just looking at what we want to have, then look at the person who can get this for us and then point to the item. We can say that this is the precursor to true joint attention, which is purely social in nature.

    Because true joint attention is an essential precursor to typical language development, the absence of joint attention in children with ASD contributes to difficulties with language learning. Beuker, K., Rommelse, N., Donders, R. & Buitelaar, J. (2013).

    The Hanen programme for Parent Child Interaction teaches parents of children with Social Communication Difficulties step by step how to enable their children to learn to pay attention to an object and the parent at the same time.

    We learn how to enable a child to:

    • engage take turns
    • shift eye gaze between toy and adult
    • copy adult’s actions, gestures and then words
    • play with toys in different, new ways
    • interact and for longer periods of time
    • have fun whilst playing

    If you would like to know more about the Hanen programme please get in touch. I look forward to exploring the topic with you and help guide you forward if this is something your child is struggling with.


    Find a speech and language therapist for your child in London. Are you concerned about your child’s speech, feeding or communication skills and don’t know where to turn? Please contact me and we can discuss how I can help you or visit my services page.

  • ·

    Let’s relax about making EYE CONTACT already…

    There’s been a long tradition with teaching staff and with Speech and Language Therapists working in schools that eye contact should be a goal. It is well known that Autistic individuals (whether that be children or adults) mostly avoid eye contact. Whilst it’s part of the way we communicate, it shouldn’t be used as a necessity for an individual who feels that it is uncomfortable. Whilst it does show that you’re listening and showing an interest, it’s not a fair expectation for neurodiverse children.

    Autistic children can find making and maintaining eye contact physically and emotionally uncomfortable as well as unnatural. It adds an extra layer of stress and has been reported to increase distractions rather than reduce them. Children who engage in conversations in their own way (i.e., with reduced eye contact) are not shown to suffer with schooling, work, or social interaction.

    By having fun through meaningful activities, I often experience that ‘BINGO’ moment (a phrase coined by Alex @meaningfulspeech) where the child is enjoying themselves and naturally makes eye contact. There is no demand on them, they are in a fun, engaging environment which suit their strengths and supports their needs.

    Following this, I often reflect on this question ‘Should we make eye contact as a goal?’

    It very much depends on the situation. If it places more demands on the child and becomes stressful. Then no. There are many strategies we can use which gain eye contact without placing extra demands on the child. We need to be mindful to adapt the environment and not place neurotypical expectations to meet the needs of neurodiverse children.

    How can you encourage eye contact without demand?

    • If you’re using toys, try holding them up to your eye level.
    • You can adjust your position, try sitting face to face during play.
    • Always get down to your child’s level. This might mean that you lay on the floor if your child is positioned in this way.
    • During play, waiting is extremely powerful. Before a key part of the activity, wait and see if your child looks at you. Remember silence is golden!
    • The best way I find is: do something unusual during play. It might be that you spray shaving foam with the lid still on. Or you bring out a wow toy and make it spin/light up or make a noise. A balloon can be good – see video clip. Use the excitement of the activity, and wait to see if you achieve that ‘BINGO’ moment.
    • Create opportunities when there are no toys involved such as during ‘tickles’ or ‘hide and seek’. Autistic children find it difficult to shift their attention between a toy and an adult. So by removing one option, you’re setting them up to succeed.

    Remember, it takes practice and time for you to develop these skills. Try one at a time and experiment, see which works best for your child. If you need speech, language or communication support or advice, I am always here to help.


    Find a speech and language therapist for your child in London. Are you concerned about your child’s speech, feeding or communication skills and don’t know where to turn? Please contact me and we can discuss how I can help you or visit my services page.

    0
  • ·

    Correcting a lisp

    Correcting A Lisp

    This is a surprisingly common speech error and it can be corrected really well in my experience. I have helped lots of children of all ages learn how to control their tongue movements and produce clear, sharp /S/ sounds and good /SH/ sounds.

    Initial consideration

    There are some factors which need to be considered before we can dive into therapy proper and these are they, in a nutshell:

    1. The student is not currently displaying negative oral habits such as thumb sucking or excessive sucking on clothing. This is because thumb sucking exerts pressure on the teeth and therefore can, over time, push teeth out of their natural order/position.
    2. The student does not have a restricted lingual frenulum or tongue tie which can cause at times restricted movements of the tongue (pending on how tight the frenulum is attaching the tongue to the base of the oral cavity); equally a labial frenulum or lip-tie can restrict lip movement and therefore physically restrict good speech sound production.
    3. The student does not have enlarged tonsils as they can sometimes push a tongue forward and also cause open mouth posture and open mouth breathing.
    4. The student’s motivation to change their speech pattern is high. (this is an important factor though with younger students I can get round this with a lot of fun games and good parental involvement!)

    When I do an Oral Assessment of my student these are the first factors I want to look at and consider. Often I will refer to other agencies such as Orthodontists, dentists or ENT specialists to advise and help with some of these factors before we can get going. However, there are strategies that we can work on almost straight away.

    Most of my Lisp students present with an open mouth posture: that is where the student has their mouth always slightly open for breathing. Over time the tongue starts to fall forward and rests on the front teeth or the bottom lip instead of finding a comfortable resting place either at the alveolar ridge (the bumpy spot behind the upper front teeth) or, alternatively, resting at the bottom of the mouth behind the lower front teeth.

    Another common problem is that the tongue is not moving independently from the jaw and so is reluctant to pull back or lift up inside the mouth as the tongue is guided in movement by the jaw.

    Combine those two factors and your tongue is not pulling back, or lifting up or doing very much at all without the jaw moving as well. This makes for unclear speech sounds, especially all the sounds we make at the front with our tongue or with our lips: /B/ /P/ /L/ /N/ and of course /S/ and /SH/ are particularly hard to make. We often also struggle with the /Y/ sound so ‘LELLOW’ instead of ‘yellow’.

    Do not fear!

    But no fear, these problems can be treated over time for sure! We often start with lip, tongue, and jaw exercises that help to move the tongue independently from the Jaw, our student learns that the tongue is a muscle and can be trained to do amazing acrobatic things in the mouth! WOW! It can actually pull back, lift up, and come down again all on its own!

    We work on breathing, holding our breath for a bit then pushing it out and then holding it again.

    And when it comes to the actual /S/ sound I often try and go a NEW route bypassing the Snake-Sound route if that is what had previously been tried and failed so that we can create completely new sound patterns in our brain and think about our sounds in a completely new way.

    We then work on producing the sound /S/ on its own for a bit, at the end of words, then on either side of complimentary sounds, for instance : ‘EASY” – the sound patterns here are EEE-S–EE : the /EEE/ sound is complimentary to the /S/ sound as the tongue is at the right hight for the /S/ already once you have it in place for /EEE/ -……see?! EASY!

    And gradually we work towards saying the /S/ sound clearly at the front of short words, then phrases and then sentences.

    The process takes some time and it depends on how ready the student is. This varies of course hugely so I can never promise the exact number of sessions we will take to get that Lisp fixed. A lot depends on home practice in between sessions, and this is of course crucial to all therapy! Every day 15-20 mins practice is a good average time to aim for and when this is done it shortens the therapy block drastically.

    I always give plenty of home work so there is never a chance of it getting boring or there being “nothing to do”!

    Do contact me. I really enjoy working with this type of student and get a great kick out of FIXING THAT LISP!


    Find a speech and language therapist for your child in London. Are you concerned about your child’s speech, feeding or communication skills and don’t know where to turn? Please contact me and we can discuss how I can help you or visit my services page.

  • ·

    How to model AAC with our minimally speaking students?

    modelling AAC

    How should we start? Should we use prompts? What kind of prompts? hand-over-hand or just pointing? Should we wait, and, if so, how long? Introducing an alternative communication system (AAC) to our child is for many of us a confusing and sometimes scary prospect, but it needn’t be! Let me reassure you and share some tricks of my practice in this area.

    Once we have decided to try for a picture based communication system, I usually start with a paper-based single page with between 48–88 core-words. I choose the number of words depending on where the child is developmentally and also verbally.

    If a child does have a small handful of words already, I might start with the 88-cell board below. If, on the other hand, my student is completely non-speaking and still quite little then I might go for the 48-cell below here or I might have even less cells to start with. Again, sometimes I start with an electronic device in my clinic just to trial and introduce the idea and to see if, or how, a student responds. 

    Below are some samples: a 49-cell board which I made for a child in a nursery setting

    Below a Saltillo WordPower board that can be downloaded from the Saltillo website:

    Example of a slightly more advanced board, again from the Saltillo Website

    And here below one example of a board I made for a specific activity for a child who loves water and sand play:

    It is perfectly possible to be very flexible and create a suitable board for any student, starting with as few as 2–5 cells and working up to over a 100 (very small ones) on a sheet of A4 or A3 paper.

    So once we have a good board for our child, what now? How do we start introducing this into our daily life?

    We can start by showing/pointing to the word GO within a play activity. For example:

    • a car run,
    • or a marble run,
    • or a spinner activity,
    • a wind-up toy,
    • anything that can be stopped and started easily.

    How to start?

    I will talk us through each of the steps using the example for the word ‘GO’.

    First phase

    The first phase is a TEACHING/ LEARNING PHASE. In this phase we do not expect our student to do anything, to copy us or to point to the board. If they do that it is of course a huge bonus and we will celebrate it.

    Our job is to simply MODEL/SHOW/GIVE EXAMPLES of how we can use the board, by steadily and regularly pointing to the chosen word or words. We do so across the day and across settings:

    • play
    • meal time
    • getting dressed/undressed
    • bath time
    • going to the car/shops
    • etc

    Once we can be sure that our student has been submerged and SOAKED in seeing the coreboard being used, say after some 3–4 weeks of using it consistently…

    Second phase

    We can begin to move into the second phase which is the PRACTICE PHASE. By now the student has seen the boards and he or she has seen the word GO (as a example) modelled many times.

    Now we can start to see if we can tempt our student into trying this out for themselves.

    What sort of TEMPTING are we talking about? Take a look at the Prompt Hierarchy below, which shows us what to do to get our student to be independently communicating as soon as possible. 

    The PROMPT HIERARCHY: what sort of prompting should we do, should we expect something from our student or how should we view this stage?

    1.  TEMPT AND PAUSE

    I have the AAC near to the toy and each time the child starts another round of the activity I say clearly ‘GO’ and I point to the picture as do so. I then pause and wait to see what happens. NOTHING? Then…

    1. USE SIGNS AND BODY LANGUAGE

    Next time the child starts another round I might be very animated and do a Makaton sign for GO as I say ‘GO’ and I make a very over point to the picture again. Then I wait. STILL NOTHING? OK then…

    1. OPEN-ENDED QUESTION

    Now I might say ‘GO’ and follow with: ‘OOH I WONDER IF THERE IS A PICTURE TO POINT TO…’

    ‘OH LOOK HERE IS GO!’ I then point to GO.

     STILL NO RESPONSE?

    1. ASK FOR A RESPONSE

    I might say ‘GO’ followed by ‘LOOK! LET’S POINT TO GO HERE ON THE PICTURE.’

    STILL NO RESPONSE? 

    1.  PHYSICAL TOUCH

    Next time I say ‘GO’ I will try and take the student’s hand, help isolate their finger and help him or her to point to the actual picture.

    REMEMBER: Prompting serves a very important function in scaffolding learning for students BUT if we are constantly prompting kids, then we are teaching them to only communicate when someone tells them to. We want our student to become as independent in speaking and using words as possible.

    So once I have done Physical Prompting I will try and phase back down to number 1 where all I need to do is point to the picture or look at the board with the aim that the student will then point to the picture.

    Take away points:

    • Keep the learning phase pressure-free and model without expecting our student to jump in. In other words, let’s model first without expectation. Later we can have a little bit of expectation.
    • After they’ve been exposed to and have been ‘soaked’ in plenty of AAC input, then, YES, we can create an opportunity to help them say or point to the word on their own.
    • We can model BOTH with and without expectation.
    • Only after LOTS of exposure, use the least to most prompting hierarchy and start creating opportunities for a student to become an independent communicator.

    Do get in touch if you have any questions or comments or if you would like some practical help.

    I am always pleased to hear from you.


    Find a speech and language therapist for your child in London. Are you concerned about your child’s speech, feeding or communication skills and don’t know where to turn? Please contact me and we can discuss how I can help you or visit my services page.

    0
  • · ·

    Baby-led weaning: Empowering little eaters from the start

    I had a mum ask me about Baby Led Weaning the other day. So I thought I would write a blog on all the useful questions she had and what we discussed as it may help lots of mums and dads out there.

    As a Paediatric Feeding SLT, one of the exciting developments in recent years is the growing interest in baby-led weaning (BLW). This approach to introducing solids has gained significant traction, and for good reason. It empowers infants to take the lead in their feeding journey, fostering a positive relationship with food and supporting important developmental milestones.

    What exactly is baby-led weaning?

    At its core, baby-led weaning is about offering your baby appropriately sized and textured solid foods from the very beginning, allowing him or her to self-feed. Instead of spoon-feeding purées, you present whole, soft foods that your baby can grasp, bring to his or her mouth, and explore at his or her own pace. This means no mashing, no blending, and no forcing spoons into reluctant mouths. It’s a fun, messy, and intuitive process that is led by your baby’s natural instincts.

    The genesis of baby-led weaning

    ‘Baby-led weaning’ was popularised by British health visitor Gill Rapley. In the early 2000s, Rapley observed that babies naturally develop the skills needed to self-feed and that traditional spoon-feeding might actually hinder this development. Her work, particularly her book Baby-Led Weaning: The Essential Guide to Introducing Solid Foods (co-authored with Tracey Murkett), published in 2008, brought BLW into the mainstream and provided a structured framework for parents. Her research and observations highlighted the benefits of trusting a baby’s innate ability to regulate his or her intake and explore different textures.

    What’s the deal?

    Implementing BLW is simpler than you might think, though it does require a shift in mindset. Here’s a breakdown of what it typically involves:

    • Readiness is key: The golden rule of BLW is to wait until your baby shows clear signs of readiness. This isn’t about age alone, but rather developmental milestones. Your baby should be at least six months old, able to sit unassisted, have good head and neck control, show an interest in food (e.g., reaching for yours), and have lost his or her tongue-thrust reflex (which pushes solids out of his or her mouth).
    • Offer finger foods: Start with soft, easily graspable foods cut into finger-sized sticks or spears. Think cooked sweet potato fries, steamed broccoli florets (soft enough to mash with gentle pressure), banana sticks, or avocado slices. The goal is for babies to be able to pick it up and get some into their mouth.
    • Embrace the mess: BLW is inherently messy, especially in the beginning. Food will be squished, dropped, and smeared. This is a crucial part of the learning process as babies explore textures, smells, and the properties of food. A wipeable mat under the highchair and a good bib are your best friends!
    • Observe, don’t interfere: Allow your baby to lead. He or she will decide what to eat, how much, and how quickly. Avoid putting food into his or her mouth or pressuring him or her to eat more. This respects his or her hunger and fullness cues, laying the foundation for healthy eating habits.
    • Continue breastmilk or formula: Until your baby is well-established on solids, breastmilk or formula remains his or her primary source of nutrition. Solids are for exploration, taste, and developing skills, gradually increasing in quantity over time.

    The benefits of baby-led weaning

    The advantages of BLW extend far beyond simply getting food into your baby. From a speech and feeding perspective, the benefits are compelling:

    • Develops oral motor skills: Chewing, gnawing, and manipulating various food textures are crucial for developing the muscles in the mouth, jaw, and tongue. This strengthens the oral motor skills necessary for speech development.
    • Enhances fine motor skills and hand-eye coordination: The act of grasping food, bringing it to the mouth, and coordinating these movements significantly refines fine motor skills and hand-eye coordination.
    • Promotes self-regulation and intuitive eating: By allowing babies to control their intake, BLW helps them tune into their own hunger and fullness cues, fostering a healthy relationship with food and reducing the likelihood of overeating.
    • Encourages adventurous eating: Exposure to a wide variety of tastes and textures from the outset can lead to less picky eating later. Babies are more likely to accept new foods when they have been in control of their exploration.
    • Facilitates family mealtimes: BLW integrates babies into family mealtimes from an early age, promoting social interaction and making mealtime a shared, enjoyable experience.

    When is baby-led weaning appropriate, and when not?

    While BLW offers numerous benefits, it’s not a one-size-fits-all approach.

    When BLW is appropriate:

    • When your baby meets all the developmental readiness signs: This is paramount for safety and success.
    • When you are comfortable with the mess and the learning curve: It requires patience and a relaxed attitude.
    • When you are committed to offering a variety of safe, appropriate foods.
    • When you are willing to learn about and practise safe food preparation to minimise choking hazards.

    When BLW might not be appropriate (or requires extra caution and professional guidance):

    • If your baby has a history of prematurity or significant developmental delays: His or her oral motor skills might not be sufficiently developed.
    • If your baby has certain medical conditions or anatomical differences (e.g., cleft palate, severe reflux, swallowing difficulties): These may necessitate a modified approach to feeding.
    • If there are significant feeding difficulties, aversion, or a history of choking incidents.
    • If you feel overly anxious about choking: While BLW, when done correctly, is not associated with a higher choking risk than traditional weaning, parental anxiety can impact the feeding experience. Education and consultation with a professional can help alleviate these concerns.

    A note on safety: Choking hazards

    It’s crucial to understand the difference between gagging and choking. Gagging is a natural reflex that helps prevent choking and is very common in BLW as babies learn to manage food in their mouths. Choking is silent and serious. To minimise choking risks:

    • Always supervise your baby closely during mealtimes.
    • Offer appropriately sized and textured foods. Avoid small, round, hard foods like whole grapes, nuts, popcorn, and large chunks of meat.
    • Ensure your baby is sitting upright and calm.
    • Educate yourself on infant CPR.

    Final thoughts

    Baby-led weaning is a wonderfully empowering approach that celebrates a baby’s natural abilities and fosters a positive and independent relationship with food. As Speech and Language Therapists we often see the positive impact it has on oral motor development, self-regulation, and overall feeding confidence. By understanding what it entails, when it’s appropriate, and prioritising safety, you can embark on this exciting journey with your little one, helping him or her become a confident and capable eater from the very first bite.

    If you would like help and support with weaning your baby whilst continuing to breastfeed then please get in touch!

    Sonja McGeachie

    Highly Specialist Speech and Language Therapist

    Owner of The London Speech and Feeding Practice.


    Health Professions Council registered
    Royal College of Speech & Language Therapists Member
    Member of ASLTIP

    Find a speech and language therapist for your child in London. Are you concerned about your child’s speech, feeding or communication skills and don’t know where to turn? Please contact me and we can discuss how I can help you or visit my services page.

    1
  • · ·

    Speech sounds practice at home

    Speech therapists use a variety of tools to help children master specific sounds, and then the students are sent home with some practice sheets to use daily. Parents are able to observe what we do in the session, but I know that back at home three days later they can’t quite remember what it was all about and how to do the practice.

    Here I explain the importance of visual cues, finger shapes, pictures, and semantic prompts (fancy speech therapy term for word clues!). By understanding these tools, you can turn practice time into a fun and engaging experience for both of you.

    Why Visual Cues matter?

    Imagine learning a new language just by listening. It’s tough, right? Young children learning new speech sounds face a similar challenge. Visual cues act like flashcards for their minds, giving them a clear picture of how to position their mouth and tongue.

    • Mirrors: Encourage your child to watch your face (and theirs) in the mirror as you make the sound together. This helps them see the tongue placement and lip movements required.
    • Mouth pictures: Speech therapy sheets often have pictures of mouths making specific sounds. Point to the picture and explain how the tongue and lips look, then have your child try to imitate it.
    • Your face is the best cue! Don’t underestimate the power of your own face. Over-enunciate the sound and let your child observe your mouth movements. Watch this little video clip where I am teaching the /SH/ sound to my little student. You cannot see him but we are both sitting on the floor opposite one another so that he can see me easily.

    Finger fun: making sounds with our hands

    Finger shapes are another powerful tool in my speech therapy arsenal. Think of them as fun reminders of how to position the tongue.

    • ‘Open Wide’ fingers: For sounds like /AH/ and /OH/, hold your fingers wide apart, mimicking an open mouth.
    • ‘Tongue Up’ fingers: For sounds like /T/ and /D/, touch the tip of your thumb to your other fingers, creating a little ‘wall’ like the tongue tip touches the teeth ridge.
    • ‘Snake Tongue’ fingers: For the /S/ sound, wiggle your pinky finger to represent the snake-like tongue tip.
    • In this little video clip I am demonstrating the C-shape moving forward which I had taught my child, showing how the windy sound (/SH/) travels forward with lips open and slightly pursed.

    Bringing sounds to life with pictures

    Pictures serve as visual prompts to connect the sound with a familiar word.

    • Video clip: I am using the WINDY SOUND picture and the FLAT TYRE sound picture to represent /SH/ and /S/ respectively
    • Point and Say: Point to each picture and say the word clearly, emphasising the target sound. Encourage your child to repeat.

    Unlocking sounds with semantic prompts

    Semantic prompts are fancy words for clues that help your child guess the target sound. They can be simple questions or descriptive words.

    • ‘Can you feel the wind whooshing?’ (/SH/)
    • Think of tyre going flat, or a balloon losing air, or a train coming to a slow halt (/S/)

    Practice makes progress, but fun makes it funnier!

    Remember, the key is to keep practice sessions light and engaging. Here are some extra tips:

    • Short and sweet: Stick to short practice times (5-10 minutes) to avoid frustration.
    • Make it a routine: Integrate practice time into your daily routine, like after breakfast or before bedtime.
    • Positive reinforcement: Celebrate your child’s efforts with praise and high fives!
    • Make it multisensory: Incorporate sensory activities like blowing bubbles for /F/ or feeling the wind for /SH/.

    Parents you’re a vital part of your child’s speech development, and together we can make huge progress quickly.

    Please contact me if your child has speech sound difficulties.

    Sonja McGeachie

    Early Intervention Speech and Language Therapist

    Feeding and Dysphagia (Swallowing) Specialist The London Speech and Feeding Practice

    The London Speech and Feeding Practice


    Find a speech and language therapist for your child in London. Are you concerned about your child’s speech, feeding or communication skills and don’t know where to turn? Please contact me and we can discuss how I can help you or visit my services page.

    1

Leave a Reply

Your email address will not be published. Required fields are marked *